When to use this article:
- Customer is increasing or decreasing device licenses (Agility 360, Agility Mobile)
- Customer is increasing or decreasing seat licenses (Agility Explorer)
- Customer is adding a new module (e.g., MRP, Shipping, Quality)
License Types⚠️ License changes are always driven by an approved quote/order from
sales@wisys.com. Do not increase a customer's license count without a corresponding order on file — the contract record and the license file must stay in sync.
WiSys/Agility licensing is tracked in three ways on a customer's contract. Confirm which type(s) are changing before you touch the Product Updater — the process is the same, but it's worth knowing what you're counting:
| Type | Applies To | Counted As |
|---|---|---|
| Device licenses | Agility 360, Agility Mobile | Per handheld/device connecting to the system |
| Seat licenses | Agility Explorer | Per named user/workstation session |
| Add-on modules | e.g., MRP, Shipping, Quality, Advanced Costing | Enabled/disabled as a feature flag on the license, not counted per-user |
A single order can include more than one of these — for example, a customer might add 5 Agility Mobile device licenses and the MRP module in the same contract update.
Request Process- Customer submits a request — the customer emails
sales@wisys.com(or their WiSys account rep) asking to increase/decrease license counts or add a module. - Sales issues a quote and, once approved, processes the order internally.
- WiSys sends a confirmation email to the customer's primary contact (see sample below) confirming the new license count and updated contract information.
- Customer (or Support, on a call) applies the change using the WiSys Product Updater — see Updating Licenses via WiSys Product Updater below.
If a customer calls Support asking to increase their own license count without a confirmation email on file, check the ticket/contract history first. Do not apply a license increase without a corresponding approved order — escalate to Sales/Order Processing if one can't be found.
Sample Confirmation EmailThis is the format Sales sends after processing a license order. All names, company info, and contract numbers below are placeholders for this KB article — never copy real customer data into documentation.
From: Sales Team <sales@wisys.com> To: [Customer Contact Name] <[contact@customer-domain.com]> Cc: WYS - DL - Orders
Hello, [First Name],
Thank you for your recent order for additional Agility [Shipping / Mobile / Explorer] licenses. This order takes you from [10] to [20] licenses.
Please click the Update License link on your WiSys Product Updater to add the new licenses.
Your Contract Information:
Product information for using WiSys Company Name: [Customer Company Name] Contract Number: [XXXXXX:XXX] Release: [3.0]
http://support.wisys.com/documentation/#t=UPDATE_LICENSE.htm
What to confirm with the customer before proceeding:
- The Company Name and Contract Number match what's on file in HubSpot/the CRM
- The new license count matches the approved order
- Whether this is a device, seat, or module change (or a combination)
Once the customer has the confirmation email in hand (or Support has verified an approved order), apply the change on the customer's server:
- Run the WiSys Product Updater as Administrator. Right-click the WiSys Product Updater shortcut on the desktop and select Run as administrator. Running elevated is required — the updater needs write access to the license file and, on some environments, to
Startup.xml. - Enter the SQL Server credentials. When the SQL Server Credentials dialog appears, enter:
- SQL Server: the customer's Macola/SQL instance name (e.g.,
[CUSTOMER-SQL-SERVER]) - Login Name: the SQL login used for updates (typically
saor a WiSys service account) - Password: the corresponding password
Click OK.
- Open the Update menu and select License. From the menu bar, click Update, then choose License from the dropdown (it sits below Update Current / Update All / Client Updater and above Menus… / Projects…).
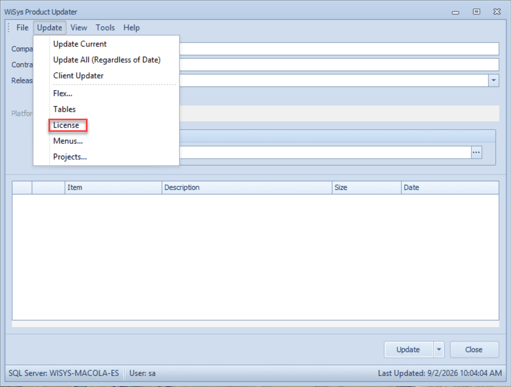
- Confirm the contract details on screen — Company, Contract Number, and Release should match the confirmation email — then click Update.
- Verify the new count by reopening the License screen or checking the relevant module in Agility Explorer/360/Mobile to confirm the new licenses are active.
Adding a New Module (e.g., MRP)💡 If the customer only has one company/server, steps 1–2 are usually all that's needed before the License option appears already populated with their contract info.
Adding a module follows the same License update process above, with one important difference:
- A pure license count change (more devices or seats) usually just needs the License update.
- A new module may require the components for that module to actually exist on the client first. Before or after updating the license:
- From the Update menu, run Update Current (or Update All (Regardless of Date) if the customer hasn't updated in a while) to pull down the current code, including any files needed for the new module.
- Then apply the License update as described above so the module shows as enabled.
- Confirm the new module appears/functions correctly in the relevant Agility application before closing out the ticket.
Troubleshooting Tips⚠️ If you update the license for a new module but skip the code update, the module may not appear or may error out — always run Update Current/All first for module additions.
- Updater won't launch / access denied: Confirm it was launched with Run as administrator — this is the #1 cause of failed license writes.
- Can't connect to SQL Server: Verify the server name and credentials match what the customer's other WiSys apps use. If this is a "Unable to Connect to Database" error, see the separate KB article on stale
Startup.xmlentries. - License updated but count still shows old value in Agility: Have the user fully close and relaunch the Agility application (Explorer/360/Mobile) — the license count is read at startup.
- New module added but not visible: Confirm Update Current/All was run before checking for the module (see previous section) — a license-only update won't push new module code.
- Wrong Contract Number or Company on screen: Do not proceed. Verify with the customer and check HubSpot for the correct contract before applying any change — applying a license update to the wrong contract record is a data integrity issue.